Hash tables provide a great data structure method for storing large quantities of data because, on average, they provide constant time - O(1) - search access to the data. The problem with big data, however, is that it's big and storage space quickly becomes a problem. To solve this, we'll need to increase our hardware capacities (i.e. get more computers). When we transition from having 1 computer that holds our data to several, we'll need to leverage distributed hash tables.
In this implementation, we're going to create and run a simulation of a distributed hash table. We'll start by taking a copy of the linear probing hash tablethat we built in a previous post and add 2 new features - consistent hashing and overlay networks.
Hey, Tyler here. I’m building Formyra, an AI-powered smart forms platform that helps businesses automate workflows, cut busywork, and turn form submissions into real growth.
If that sounds interesting, I’d love for you to check it out!
Consistent hashing is useful for creating scalability in storage architecture. Basically, you could add new computers (or take them away) from your distributed hash table without needing to rebuild the entire storage system. You'll see in my example below that I use consistent hashing to create an algorithm to hash incoming data and map it to a particular computer based on the hash value.
Overlay networks provide communication between computers. So, consistent hashing will determine which computer the data will be stored in and the overlay network will assign a backup of the file to the computer's nearest neighbor. Or, when a computer is down, the network will send the data to the next nearest computer and the backup to its nearest neighbor and so on. Protecting data and improving uptime are also benefits of this system.
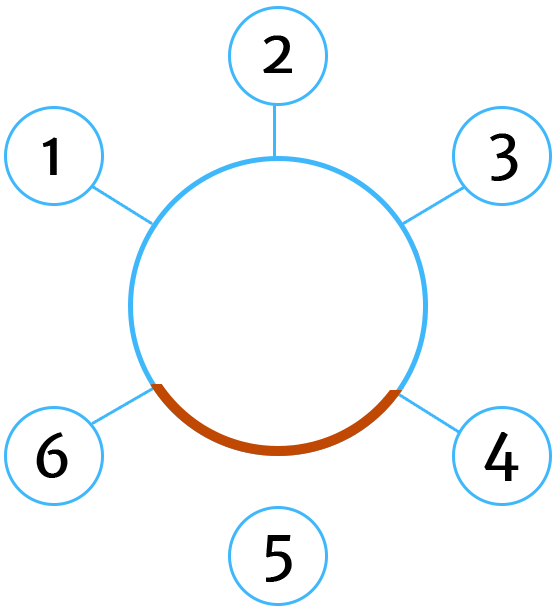
Here's a visual:

In this network, computer #5 has gone offline so computers 4 and 6 extend to cover the gap and keep the network whole.
So, we'll need to create 2 new classes for our simulation - one for our network and one for each computer in our network. Fortunately, we can keep our previously created hash tableas it is, for the most part, so we won't cover that again here.
JavaScript
function Computer(id, size) {
	this.id = id
	this.status = true
	this.size = size
	this.table = new hashTable(id, size)
}
First, we'll create a class called Computer that will take an id and a size - both will be provided by network class. We'll use the id to label the computer's and connect them to our consistent hashing algorithm. Our status variable will tell our program if the computer is currently online, and then we'll need to create a new hash table of designated size since each local computer will house their own hash table. While the table will be independent, it will still be connected to our overlay network and will be used for backing up it's neighbors.
JavaScript
function OverlayNetwork(size) {
	this.size = size
	this.network = new Array(size)

	for (i = 0; i < size; i++) {
		this.network[i] = new Computer(i, 100)
	}
}
Our OverlayNetwork class takes a size, creates a network that will just be an array of computers, and then implement a new Computer class object of id i and size 100 for each value of the array until the size of the network is reached.
JavaScript
OverlayNetwork.prototype.hash = function(S) {
	var a = 113 // random number between 1 and p - 1
	var b = 87 // random number between 1 and p - 1
	var p = 10000019 // prime number - the higher the more unique
	var m = this.size // hash table rows
	var x = 0
	for (i = 0; i < S.length; i++) {
		x += S.charCodeAt(i)
	}
	return ((a * x + b) % p) % m // return result of hash formula
}
We'll need a hash function to implement our consistent hashing, so we'll create one that belongs to our OverlayNetwork class. As opposed to our previous example, the function hashes a string instead of an integer (similar to my previous post on Rabin-Karp's substring algorithm). This function only maps values from 0 to 9 since the size of our network at this time is only 10 computers. It's with this hash that we'll know which computer to send our data.
JavaScript
OverlayNetwork.prototype.add = function(data) {
	var hash = this.hash(data) // get hash value to determine which computer to save file to
	var computer = this.computer(hash) // get computer value from network hash
	var table = computer.table // get table
	var added = table.add(data, computer.id) // add data to table

	if (added) { // if we added the data to a computer, we'll create a backup to a neighbor
		var backup = this.backup(hash) // find backup computer
		table = backup.table
		table.add(data) // add data to backup computer
	}
}
To add data, we'll call this add function with a string-value argument. The function will start by creating a hash to determine which computer on the network the data will be sent to. Once we've located a computer and verified that is currently active, we'll add the data to the table. If the data was added successfully then we'll create a backup copy of the data on a neighboring computer.
Another element that we added to our program was distributed storage. Think of how some of the largest data storage companies (like Google and Dropbox) are able to store such vasts amount of data and how the uploads of new files often seem instantaneous. It's because they're leveraging distributed storage systems built on top of hash functions, specifically, they're not reuploading files that have already been uploaded to their servers. Before upload, they hash the new data coming in and check whether it matches existing data somewhere in their storage systems. If it does, then instead of reuploading the file they simply create a link between the user and that existing data. If it doesn't match, then they go ahead with the upload.
So, to emulate this, what we've done is added to the hashTable class and, specifically it's add function (again, refer to this previous post) is 2 additional hash functions that create hash valued that we store along with our data. So when a new file is added, we compare the data against, in essence, 3 hash values (the initial key plus the store values stored in the table) to ensure that the file is the same.
Looking back at our network's add function, when we call the table's add function, it will either return to us a message that the data has been added or a link to the preexisting data.
JavaScript
OverlayNetwork.prototype.remove = function(data) {
	var hash = this.hash(data) // get hash value to determine which computer to save file to
	var computer = this.computer(hash) // get computer value from network hash
	var table = computer.table
	table.remove(data, computer.id) // remove data from computer
}
To remove data, we'll create a remove function that will be called on the table's that house our data.
JavaScript
OverlayNetwork.prototype.computer = function(hash) {
	var computer = this.network[hash] // get hash value to determine which computer to save file to
	var i = 0
	while (!computer.status) { // our simulated method of consistent hashing
		i++
		computer = this.network[hash + i] // increment by 1 to get the computer's neighbor
	}
	return computer
}
Called previously, our computer function will be what the network uses to locate a computer by checking its status. If its status returns as true then it will return that computer. If not, it'll loop to the next computer in the network circle.
JavaScript
OverlayNetwork.prototype.backup = function(hash) {
	if (this.network[hash + 1]) { // check if next computer exists to use as backup
		var i = hash + 1
	} else {
		var i = 0
	}
	var backup = this.network[i] // set backup to computer
	while (!backup.status) {
		if (i >= this.size - 1) {
			i = 0
		} else {
			i++
		}
		backup = this.network[i]
	}
	return backup
}
Our backup function will do the same thing except that it will check to see if the next computer exists in the network or if it should circle around to the first computer in the network.
Now we have all that we need to run a basic distributed hash table leveraging consistent hashing and an overlay network. Other functions have been created to simulate users uploading, removing and downloading data, and computers going offline and coming back again as you'll see in the log.
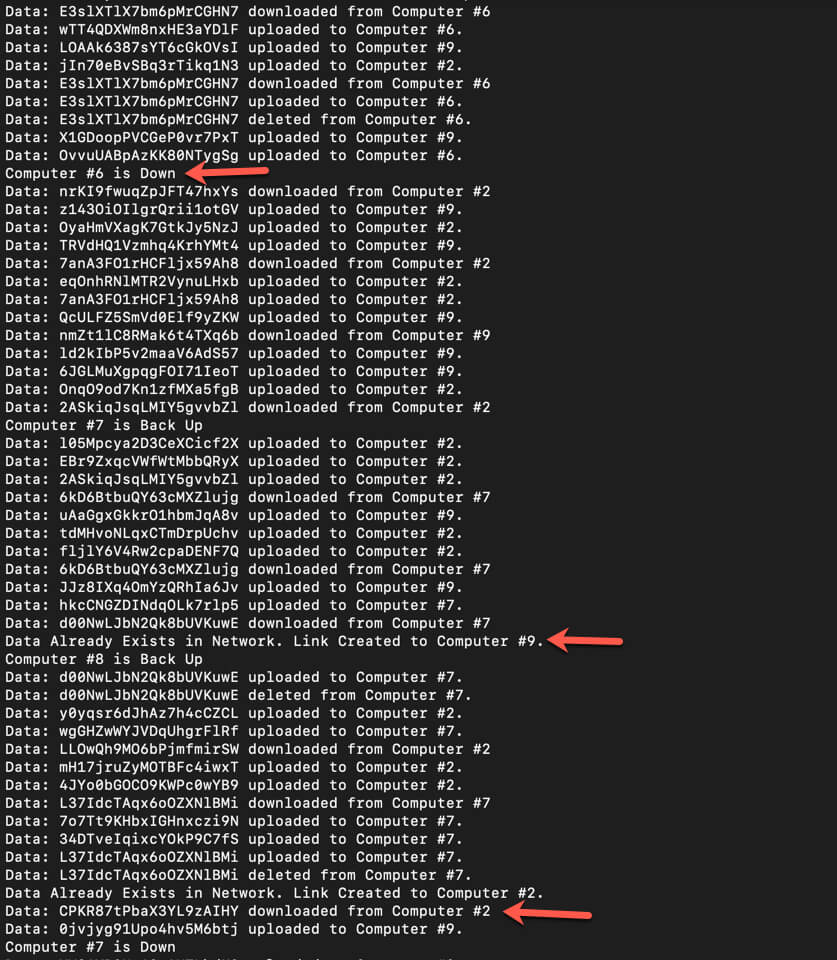
Here's a snapshot of the result:

You can see normal user behavior - uploading, downloading and removing of files. As the arrows indicate, a few other things are happening as well:
Tweet me @tylerewillis